Download TeraCopy – Fast, Secure File Transfers
Replace Windows Explorer with a more reliable file handler. Pause transfers, verify data integrity with 17+ checksums, and recover from errors without failing the entire job.
What Is TeraCopy?
A purpose-built file transfer tool that picks up where Windows Explorer stops.
TeraCopy is a file copy utility developed by Code Sector, an Australian software company, that replaces the built-in Windows Explorer file transfer handler. If you have ever lost a 40-gigabyte backup job because one file out of 30,000 was locked by another program, you already understand the problem TeraCopy solves. Instead of aborting the entire operation, TeraCopy skips the problematic file after a few automatic retry attempts, finishes the rest of the job, and then presents you with a clear list of what failed so you can deal with it on your own terms.
Built for Speed, Designed for Reliability
Under the hood, TeraCopy uses dynamically adjusted buffers and asynchronous read/write operations to push your hardware closer to its theoretical maximum throughput. On mechanical hard drives, where the read/write head physically moves between locations, this approach cuts down on seek times and delivers noticeably faster transfers compared to Explorer. On modern NVMe SSDs transferring a single large file, the speed difference shrinks because the bottleneck shifts to the drive controller itself. But when you are moving thousands of small files across drives, TeraCopy still holds an edge thanks to smarter queuing and reduced overhead.
Data Integrity You Can Actually Verify
The feature that keeps sysadmins and photographers coming back to TeraCopy is checksum verification. After a copy finishes, you can click one button and TeraCopy will hash every file at both the source and destination, then compare the results byte for byte. It supports over 17 algorithms, from the well-known CRC32 and SHA-256 to newer options like BLAKE3 and xxHash3. If even a single bit flipped during transit, you will know about it before you wipe the source drive.
Who uses TeraCopy? IT professionals managing server migrations, photographers backing up RAW files from SD cards, video editors moving multi-terabyte project folders, data hoarders archiving collections, and everyday Windows users who got tired of watching Explorer choke on a batch of files. TeraCopy has been downloaded millions of times since its first release in 2007.
TeraCopy 3.17, the current stable release, runs on Windows 7 through Windows 11, including all Windows Server editions from 2003 to 2025. A release candidate for version 4.0 is also available, introducing a refreshed interface, native Windows 11 context menu integration, and an improved queue system. Both versions are free for personal use. Commercial and business use requires a TeraCopy Pro license at $29.95.
What TeraCopy Actually Does
Every feature listed here works in the free version unless marked Pro.
Faster Multi-File Transfers
Asynchronous read/write operations and dynamically adjusted buffers (up to 256 MB) reduce seek times on mechanical drives. On a batch of 2,000 photos, that translates to noticeably shorter wait times compared to Explorer.
Pause and Resume Transfers
Click pause to free up disk bandwidth for other work. Click resume to pick up exactly where you stopped. Unlike Explorer, TeraCopy fully releases file handles so other applications can use the drive without conflict.
Checksum Verification
After copying, hash both source and destination files using CRC32, MD5, SHA-256, BLAKE3, xxHash3, or any of 17+ supported algorithms. Catch even single-bit corruption before you delete the originals.
Error Recovery and Skip
One locked file does not kill the entire transfer. TeraCopy retries a few times, then skips problematic files and continues with everything else. A clear report at the end shows exactly what failed and why.
Shell Integration
Register TeraCopy as the default copy handler and every Ctrl+C/Ctrl+V and drag-and-drop operation goes through TeraCopy automatically. Version 4.0 RC adds native Windows 11 context menu support.
Volume Shadow Copy (VSS)
Need to copy a file that another application has locked? TeraCopy taps into the Windows VSS service to grab a snapshot of the file without interrupting the program that holds the lock.
Transfer Queue
Start multiple copy jobs and TeraCopy runs them one at a time instead of simultaneously. This prevents disk thrashing on HDDs where parallel operations tank performance to a crawl.
Interactive File List
See every file in the current operation with status indicators: completed, in progress, failed, or skipped. Select individual files to retry, remove from the queue, or inspect error details.
Timestamp Preservation
TeraCopy keeps original creation, modification, and access dates intact during copy and move operations. Your folder sorting and file versioning stay consistent after the transfer.
Post-Transfer Automation
Configure TeraCopy to shut down the PC, eject the drive, hibernate, or run a custom PowerShell script after the job finishes. Useful for overnight transfers or unattended backups.
Multi-Target Backup
Copy files to multiple destination folders in a single operation. Back up your project to a local drive, an external USB, and a NAS at the same time without running three separate jobs.
Transfer Reports
Export detailed logs of every transfer in HTML, CSV, or TXT format. Each report includes file names, sizes, checksums, and error details. Handy for compliance audits and project documentation.
System Requirements
Both versions run on modest hardware. Pick the one that matches your OS.
| Operating System | Windows 7, 8, 10, 11 (32-bit and 64-bit) |
| Server OS | Windows Server 2003 through 2025 |
| Installer Size | 10 MB (.exe) |
| Processor | 1 GHz or faster (any modern CPU) |
| Memory | 1 GB minimum |
| Disk Space | 20 MB installed |
| Additional | Admin rights needed for shell integration |
| Operating System | Windows 10, 11 only (64-bit) |
| Server OS | Windows Server 2016 through 2025 |
| Installer Size | 14 MB (.exe) |
| Processor | 1 GHz or faster (any modern CPU) |
| Memory | 1 GB minimum |
| Disk Space | 30 MB installed |
| Additional | Admin rights needed for shell integration |
v4.0 drops support for Windows 7 and 8. If you run an older OS, stick with v3.17.
Download TeraCopy
All downloads come directly from Code Sector. Digitally signed, no bundled adware.
TeraCopy 3.17 Stable
The fully tested stable release. Supports Windows 7, 8, 10, and 11, plus Windows Server 2003 through 2025. Best choice for production and daily use.
Download TeraCopy 3.17TeraCopy 4.0 RC2
Next-generation UI with native Windows 11 context menu, improved queue system, and better long-path support. For testing and early adoption.
Download TeraCopy 4.0 RC2TeraCopy in Action
Screenshots from the official TeraCopy interface showing core features.
Getting Started with TeraCopy
From download to your first verified file transfer in about five minutes.
Downloading TeraCopy
Head to our download section and grab the version that matches your system. For most users, TeraCopy 3.17 Stable is the right pick. It works on Windows 7 through Windows 11, including both 32-bit and 64-bit editions, and the installer weighs just 10 MB so the download finishes almost instantly on any connection.
If you are running Windows 10 or 11 and want to try the next-generation interface, the 4.0 RC2 installer is 14 MB. Keep in mind that v4.0 drops support for Windows 7 and 8, so if you need backward compatibility, stay on 3.17.
You have three formats to choose from. The .exe installer is the standard route and handles shell integration, Start menu shortcuts, and registry entries automatically. The portable ZIP extracts to any folder (or a USB drive) and runs without installing anything system-wide, which IT technicians moving between client workstations tend to prefer. And if you like automatic updates, the Microsoft Store version handles that for you.
Installation Walkthrough
Double-click the downloaded teracopy.exe file. The installer follows a straightforward wizard:
- Welcome screen — click Next to proceed.
- License agreement — read through the EULA and click “I Agree.”
- Install location — the default path is
C:\Program Files\TeraCopy. Change it only if you have a specific reason to. - Shell integration — this is the important screen. You will see checkboxes for:
- “Add to context menu” — adds a “TeraCopy…” entry when you right-click files in Explorer. Leave this checked.
- “Use as default copy handler” — makes TeraCopy intercept every Ctrl+C/Ctrl+V and drag-and-drop. Recommended if you want TeraCopy to handle all transfers automatically.
- “Create desktop shortcut” — optional, depending on preference.
- Install — click Install and wait 10-15 seconds. Explorer may briefly flicker as the shell extension registers.
- Done — click Finish. TeraCopy is ready to use immediately.
For enterprise or silent deployment, run the installer with flags: teracopy.exe /VERYSILENT /SUPPRESSMSGBOXES /NORESTART. This completes the install without any UI prompts, useful for SCCM or PDQ deployments.
Initial Setup and Configuration
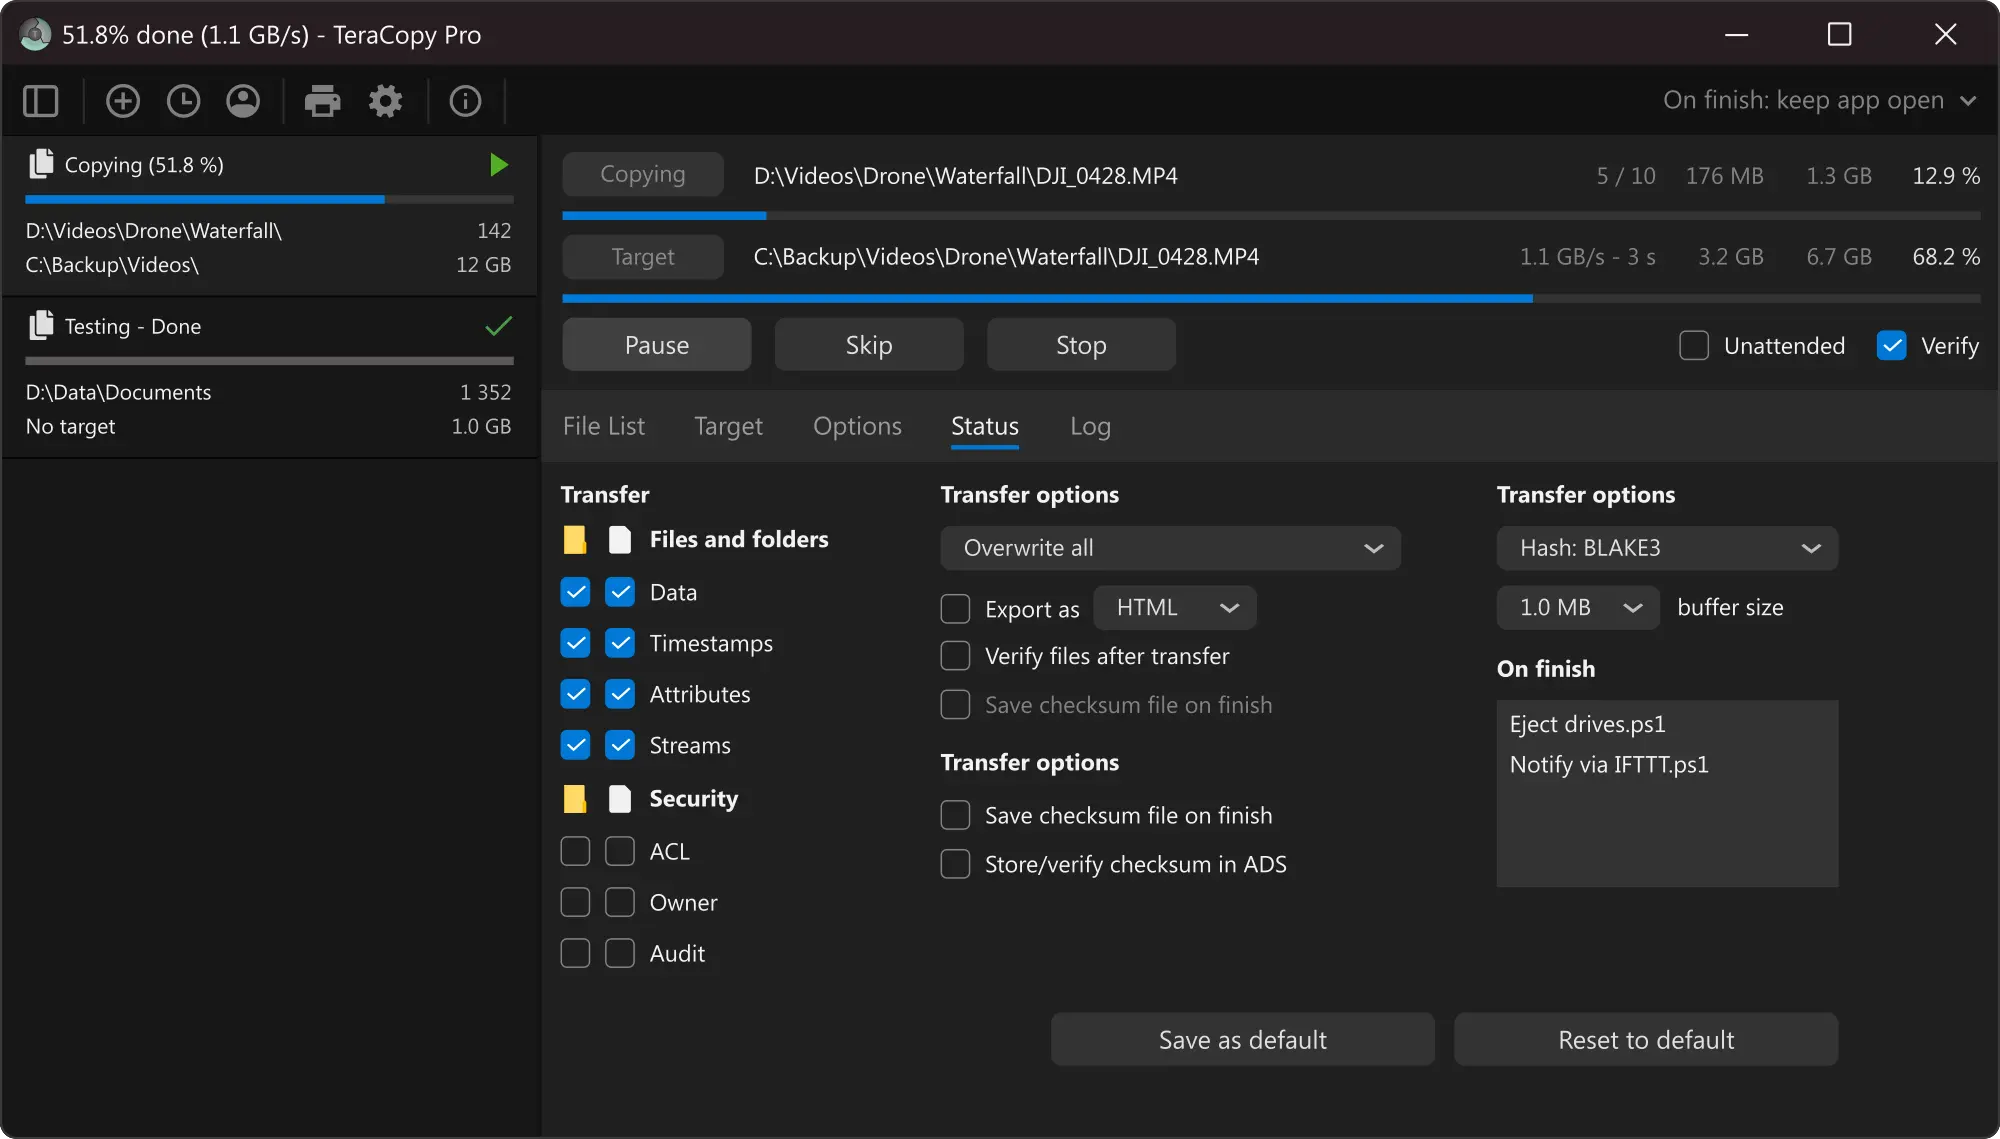
After installation, open TeraCopy from the Start menu or right-click any file and select “TeraCopy…” to launch it. Before your first real transfer, take 30 seconds to check a few settings. Open Preferences (the gear icon in the top-right corner) and review these options:
- Copy method — leave at “Automatic” unless you have a reason to force synchronous mode. The automatic setting picks the fastest strategy based on your hardware.
- Buffer size — default works well for most drives. If you are transferring to/from a high-speed NVMe, you can increase this to 256 MB to fill the write queue more efficiently.
- Error recovery — make sure “Skip files with errors” is enabled. This is the setting that prevents one bad file from killing your entire batch transfer.
- Checksum algorithm — the default CRC32 is fast and catches most errors. For mission-critical data (medical records, financial backups, archival), switch to SHA-256 or BLAKE3 for stronger guarantees.
- Confirm drag and drop — if enabled, TeraCopy shows a confirmation dialog before starting a transfer triggered by drag-and-drop. Useful if you have a habit of accidentally dragging files into the wrong folder.
C:\Users\[YourName]\AppData\Roaming\TeraCopy. If you want to carry your settings to another machine, copy that folder.
Your First File Transfer
There are three ways to start a transfer with TeraCopy:
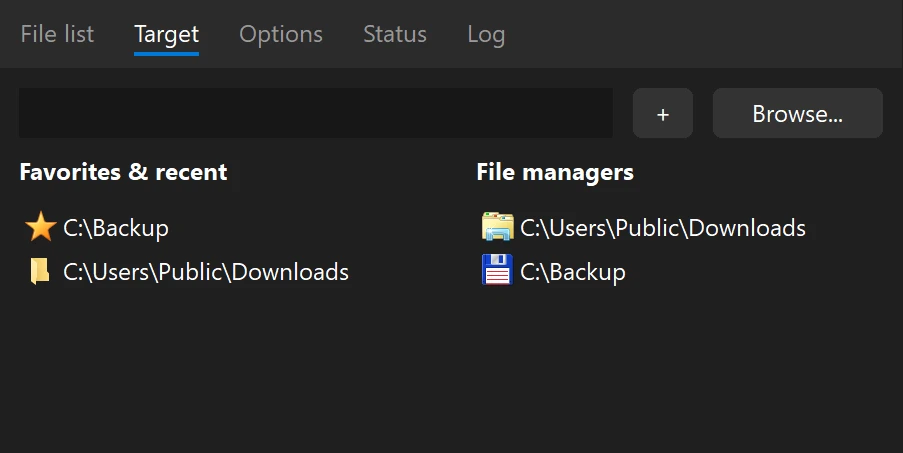
Method 1: Context menu. Select one or more files in Windows Explorer, right-click, and choose “TeraCopy…” from the menu. The TeraCopy window opens with your files already listed. Click “Target” to choose the destination folder, then click “Copy” or “Move.”
Method 2: Drag and drop. If you set TeraCopy as the default handler, simply drag files from one folder to another. TeraCopy intercepts the operation and shows its own transfer window instead of the stock Windows progress bar.
Method 3: Direct launch. Open TeraCopy from the Start menu, click “Select Files” to add items, then click “Target” to pick the destination. This works well when you need to build a list of files from different folders before starting the transfer.
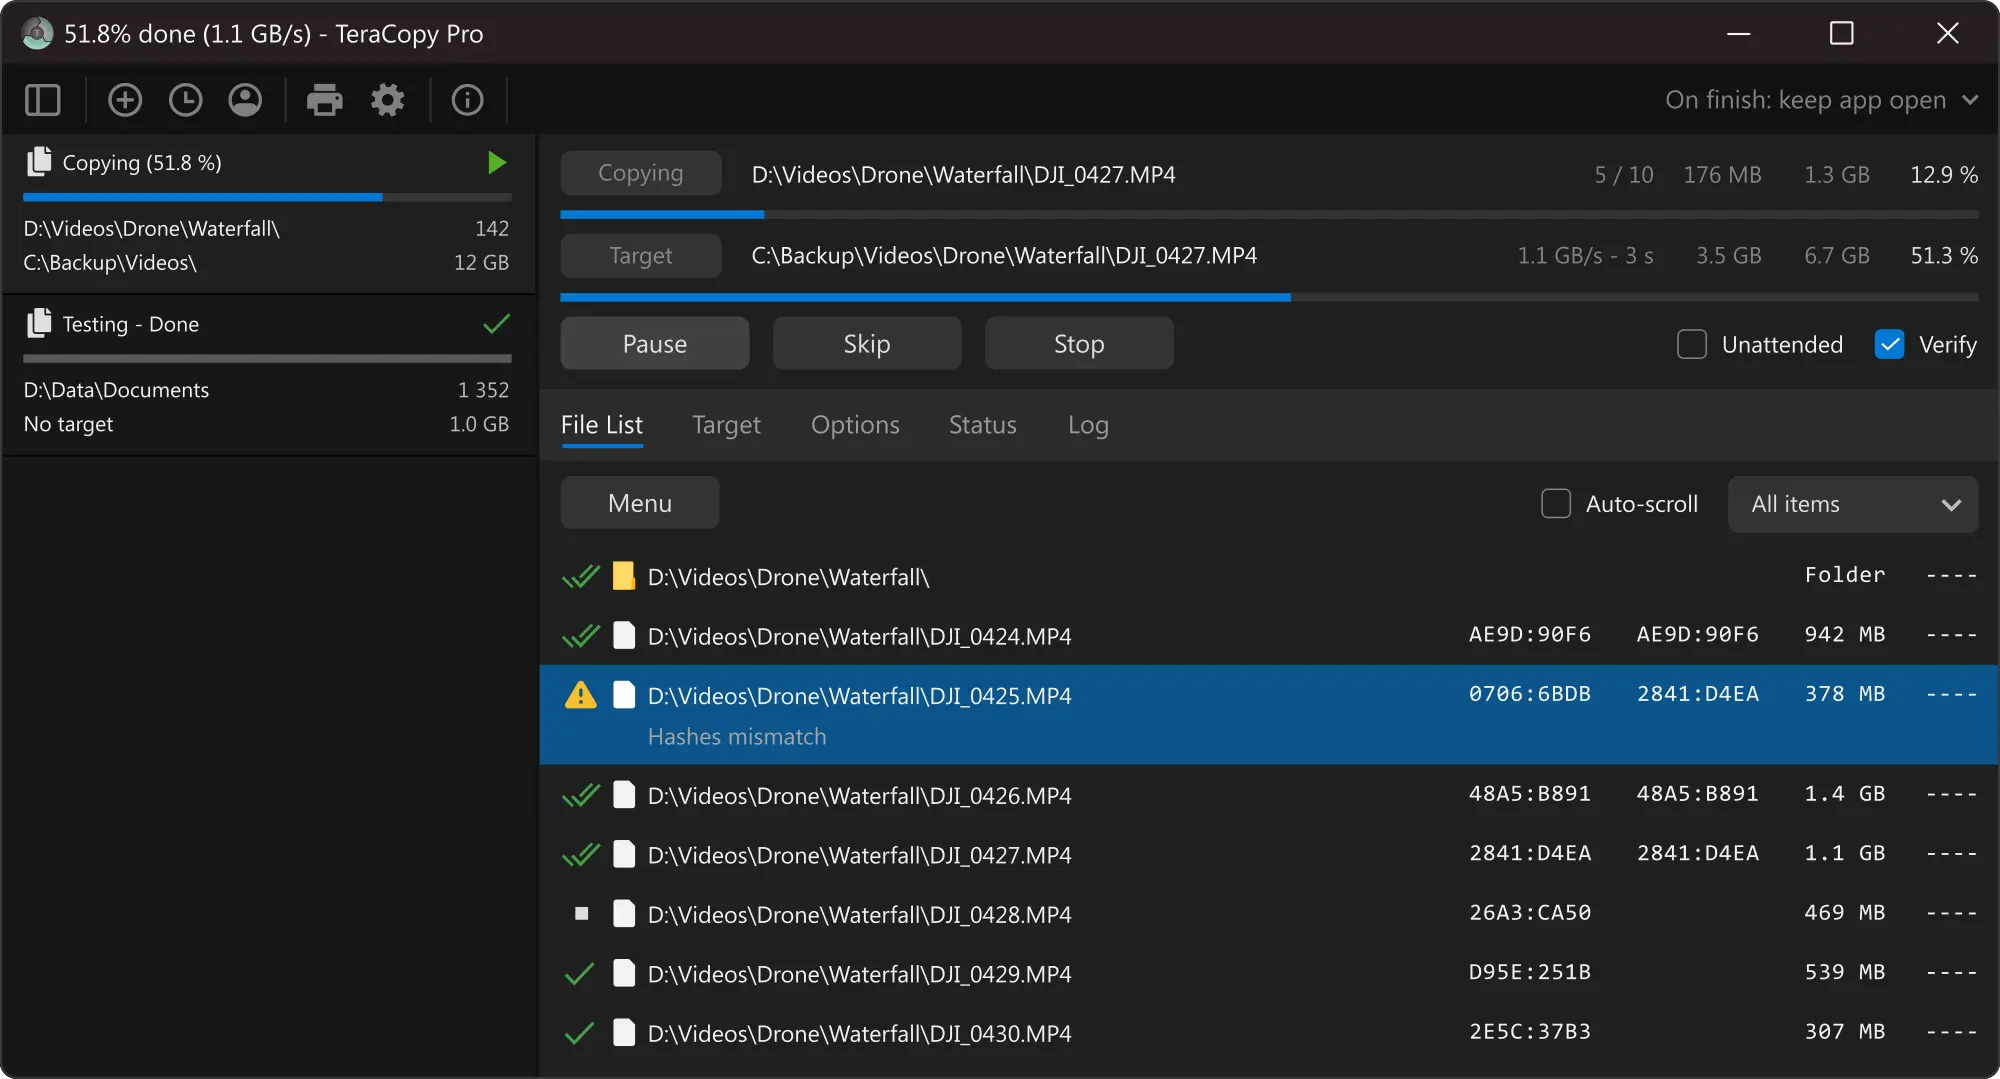
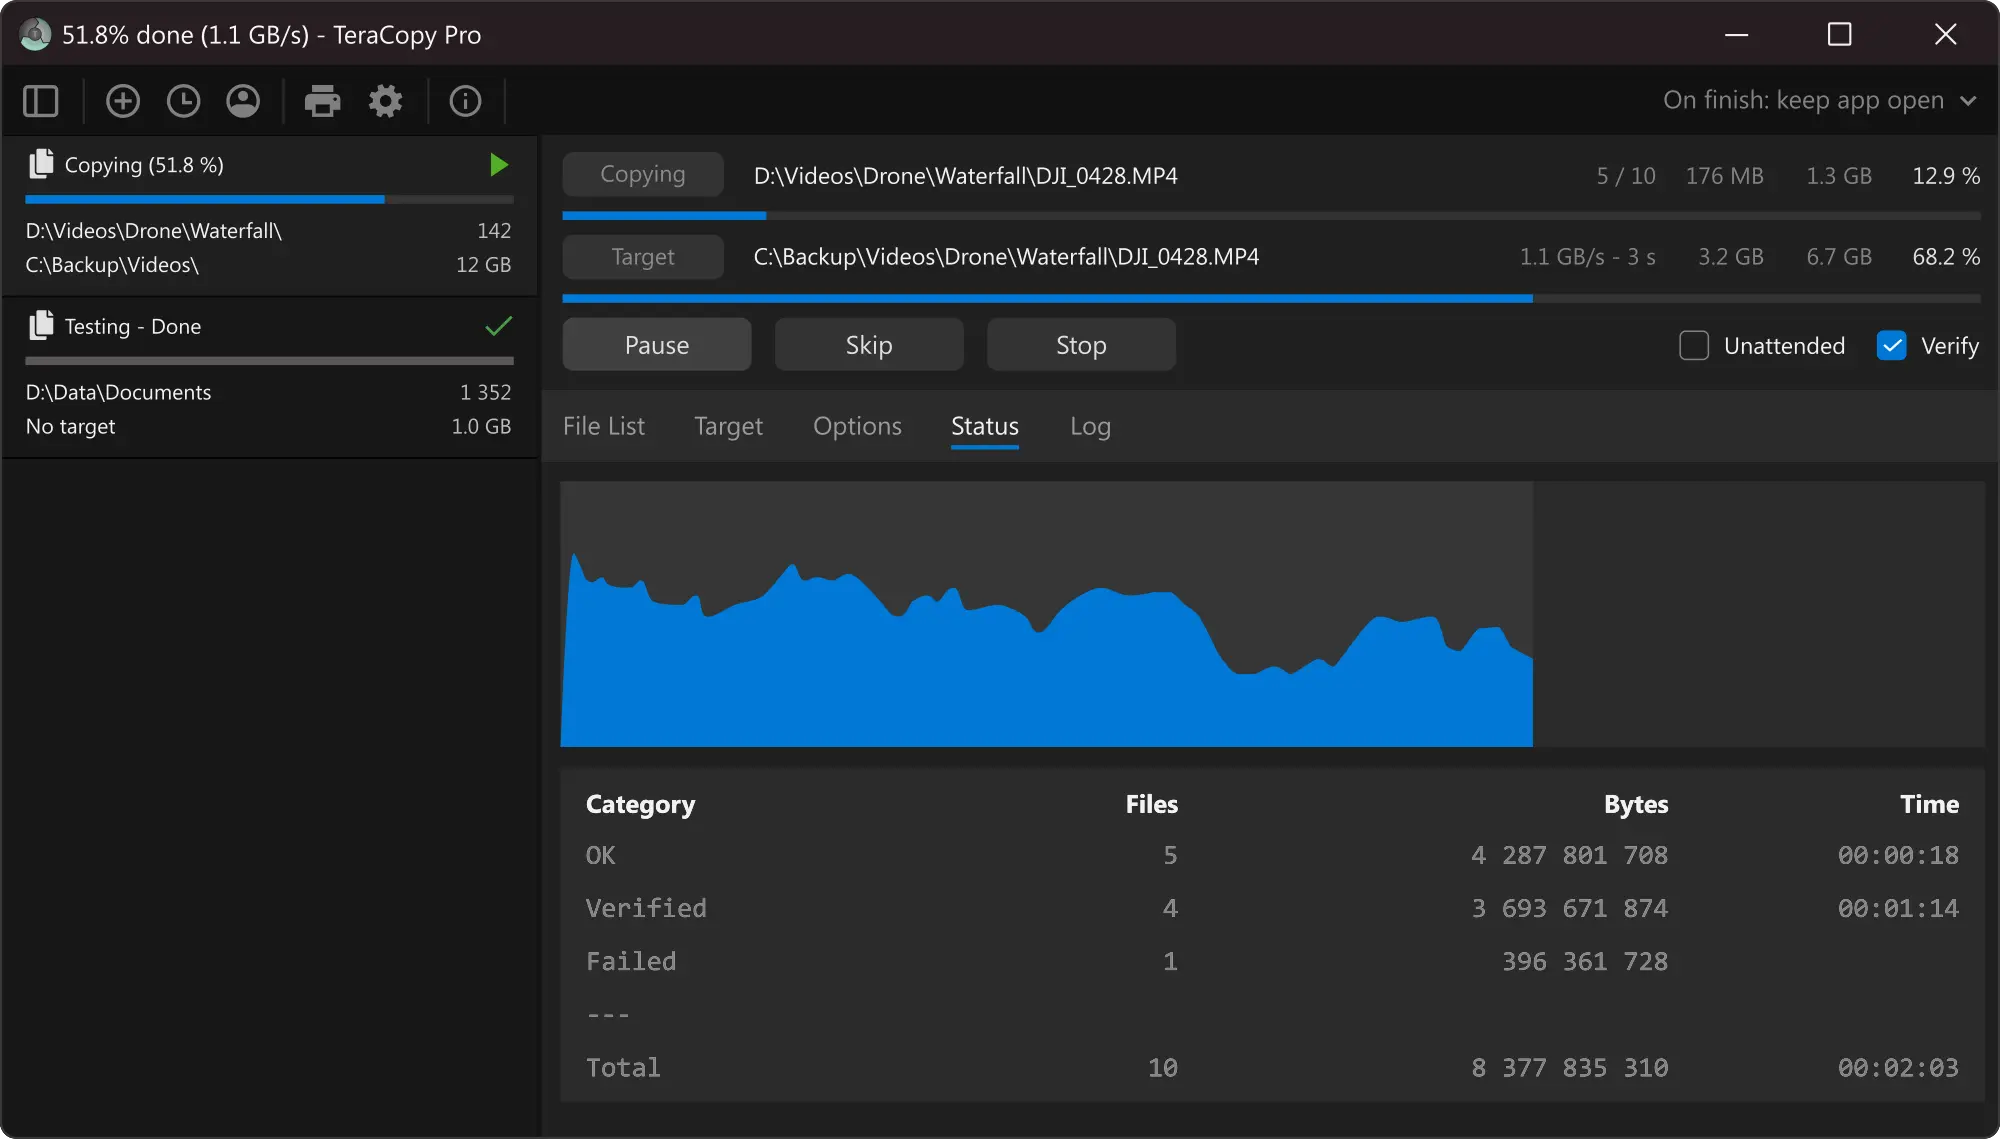
Once the transfer begins, the main window shows a real-time speed graph (useful for spotting hardware issues), the current transfer rate in MB/s, and estimated time remaining. Each file in the list gets a status icon: green check for completed, blue arrow for in-progress, orange triangle for warning/retry, red X for failed.
After the transfer finishes, click the “Verify” button. TeraCopy will compute checksums for every file at both the source and the destination and compare them. If all hashes match, your data transferred without corruption. This step is optional but strongly recommended for anything you cannot afford to lose.
Tips, Shortcuts, and Power-User Features
Once you are comfortable with basic transfers, these features will help you get more out of TeraCopy:
Keyboard shortcuts:
F2 Rename selected fileF5 Retry failed filesSpace Pause / resume transferDelete Remove file from listCtrl+A Select all filesBackspace Go to parent folderPost-transfer actions. In the bottom-left corner of the TeraCopy window, there is a dropdown labeled “Post-action.” Set it to “Shut down” to power off the PC after an overnight transfer, “Eject” to safely remove a USB drive, or “Sleep” / “Hibernate” to save energy once the job wraps up. You can also select “Run script” and point it to a PowerShell script for custom automation.
Queue management. If you start a second copy while the first one is still running, TeraCopy queues it instead of running both simultaneously. On mechanical hard drives, this prevents the head from thrashing between two read/write locations, which would slow both jobs down to a crawl. On SSDs, the difference is smaller, but queuing still keeps things organized.
Handling duplicates. When TeraCopy encounters a file that already exists at the destination, it shows a conflict dialog with options: overwrite, skip, rename, or overwrite only if the source is newer. You can apply your choice to all remaining conflicts in one click.
winget install --id CodeSector.TeraCopy. This pulls the latest stable version directly from the Winget repository.
Where to get help. The official support site is at support.codesector.com. For community discussions, the subreddits r/DataHoarder and r/sysadmin frequently discuss TeraCopy tips and troubleshooting. The Code Sector blog at blog.codesector.com publishes changelogs and feature announcements for each release.
Frequently Asked Questions
Answers to the questions people actually search for about TeraCopy.
Is TeraCopy safe to download?
Yes, TeraCopy is safe. The installer distributed through codesector.com is digitally signed by Code Sector Pty Ltd, an Australian software company that has been publishing TeraCopy since 2007. The SHA-256 hash for the v3.17 installer is AC03DB52BB68A013D3A8BF4DB703EC11976FA1D0AA557EB988E3F926A26656CF, which you can verify with any hash checker before running the file.
The software contains no adware, no bundled toolbars, and no background telemetry beyond a standard update check. It has been reviewed and listed on major distribution platforms including the Microsoft Store, Softpedia (with a “100% Clean” award), and MajorGeeks. Millions of users, including IT professionals managing sensitive corporate data, run TeraCopy daily.
Pro tip: Always download from codesector.com or the Microsoft Store. Third-party download sites sometimes wrap legitimate installers in their own adware bundles, which has nothing to do with TeraCopy itself.
For more details on the download options, see our download section.
Is TeraCopy free?
TeraCopy is free for personal, non-commercial use with no time limits and no trial restrictions. The free version includes all core features: faster transfers, pause/resume, error recovery, checksum verification, shell integration, VSS support, queue management, and timestamp preservation.
TeraCopy Pro costs $29.95 as a one-time purchase (lifetime license with updates). Pro adds features geared toward professional and commercial use:
- Commercial/business use license
- Multi-target backup (copy to several locations at once)
- Advanced multi-threading beyond 2 threads
- Ignore lists to auto-exclude certain files
- Transfer report exports in HTML, CSV, and TXT
- Edit file lists before starting a transfer
- Favorite folder management
Volume discounts are available: 15% off for 2-9 licenses, scaling up to 40% off for 50-99 licenses. The software is occasionally discounted on deal sites like BitsDuJour and SharewareOnSale.
Pro tip: If you are a home user who just wants faster, more reliable file copying, the free version covers everything you need. Pro is worth considering if you need transfer reports for compliance, or multi-target backup for redundancy.
Is TeraCopy actually faster than Windows Explorer?
It depends on the scenario. On mechanical hard drives (HDDs) transferring batches of mixed-size files, TeraCopy is measurably faster. Independent benchmarks from Kitz Forum showed TeraCopy completing a 2.16 GB music collection transfer (many small files) in 102 seconds versus Explorer at around 115 seconds. The improvement comes from asynchronous read/write operations that reduce seek times on spinning platters.
On modern NVMe SSDs transferring a single large file, the speed difference shrinks to near zero because the bottleneck shifts from the file system layer to the drive controller itself. In some NVMe-to-NVMe transfers, Explorer performs identically.
Where TeraCopy consistently wins, regardless of drive type, is in overall efficiency when something goes wrong. Explorer stops the entire batch if one file is locked or corrupted. TeraCopy skips it, finishes the rest, and reports the failures. That “not losing 45 minutes because of one bad file” aspect is a bigger time saver than raw throughput for most users.
Pro tip: For maximum speed on HDDs, make sure “Queue transfers” is enabled so TeraCopy processes one job at a time, preventing the read/write head from bouncing between operations.
Check our features section for a full breakdown of how TeraCopy handles transfers differently.
Does TeraCopy work on Windows 11?
Yes, both TeraCopy 3.17 and the newer 4.0 RC2 are fully compatible with Windows 11. Version 3.17 integrates through the classic right-click context menu (the “Show more options” submenu). Version 4.0 RC2 goes a step further by adding a native entry in the Windows 11 modern context menu, so you see “TeraCopy” right in the first-level menu without clicking “Show more options.”
Shell integration, drag-and-drop interception, and the “default copy handler” mode all function correctly on Windows 11 22H2 and 23H2 builds. If you register TeraCopy as the default handler, Ctrl+C/Ctrl+V in Explorer goes through TeraCopy on Windows 11 just like it does on Windows 10.
Note that v4.0 RC2 requires Windows 10 or 11 only and drops support for Windows 7 and 8. If you run Windows 11, the 4.0 RC gives you the best integration experience, but 3.17 works perfectly fine as well.
Pro tip: After installing TeraCopy on Windows 11, restart Explorer (or log out and back in) to make sure the context menu entries appear reliably. Occasionally the shell extension needs an Explorer restart to register.
How do I make TeraCopy the default copy handler?
There are two ways. During installation, check the box labeled “Use as default copy handler” on the options screen. If you already installed TeraCopy without that option, open the TeraCopy application, click the gear icon (Preferences), and enable “Use as default copy handler” from there.
Once enabled, every Ctrl+C/Ctrl+V file operation and every drag-and-drop move in Windows Explorer is handled by TeraCopy instead of the built-in Windows copy dialog. You will see the TeraCopy window with its progress bar, speed graph, and file list instead of the standard Windows copy animation.
To revert to the Windows default, open TeraCopy Preferences and uncheck the same option. Your original copy dialog returns immediately without needing to uninstall TeraCopy. You can still use TeraCopy on-demand through the right-click context menu even when it is not the default handler.
Pro tip: Some users prefer to keep the default handler off and use TeraCopy selectively via right-click for large transfers, while letting Windows handle small day-to-day copy operations. That is a valid approach if you find the confirmation dialog annoying for quick single-file copies.
See our Getting Started guide for the complete installation walkthrough.
What checksum algorithms does TeraCopy support?
TeraCopy supports over 17 checksum algorithms for file verification. The full list includes CRC32, MD5, SHA-1, SHA-256, SHA-512, Panama, Tiger, RipeMD-128, RipeMD-256, Whirlpool, BLAKE3, xxHash (xxHash32 and xxHash64), and xxHash3. TeraCopy 3.17 added SSE2-optimized xxHash support for faster verification on modern CPUs.
For everyday use, CRC32 is the fastest option and catches most accidental corruption. For data archival, backup verification, and security-sensitive work, SHA-256 or BLAKE3 are better choices because they detect intentional tampering as well as accidental errors. BLAKE3 is the newest addition and offers SHA-256-level security at speeds approaching CRC32, making it the best overall choice if your version supports it.
To run a verification: complete your file transfer, then click the “Verify” button in TeraCopy. It computes the selected hash for every file at both the source and destination. If any hash does not match, that file is flagged in the list so you can re-copy it. You can also generate standalone checksum files (.md5, .sha256) and save them alongside your data for later verification.
Pro tip: BLAKE3 runs about 4x faster than SHA-256 on modern hardware while providing equivalent collision resistance. If your version of TeraCopy offers it, use BLAKE3 for verification to cut wait times on large transfers.
Can TeraCopy copy locked files?
Yes. TeraCopy can copy files that are currently open or locked by another application using the Windows Volume Shadow Copy (VSS) service. When TeraCopy encounters a locked file, it requests a shadow copy snapshot from Windows, which captures the file’s state at that moment. The copy is made from this snapshot, so the program holding the lock is never interrupted.
This is particularly useful for backing up database files (like .mdb or .sqlite), virtual machine disk images, Outlook .pst files, or any application data file that stays open while the software is running. Without VSS, you would need to close the application first, which is not always practical or possible.
VSS requires administrator privileges. If you run TeraCopy as a standard user, locked files will be skipped instead of copied via shadow copy. To use VSS, either run TeraCopy as administrator (right-click, “Run as administrator”) or configure your user account with the appropriate backup operator privileges.
Pro tip: VSS works best for files under active write. If a file is exclusively locked (not just open), even VSS may not be able to access it. In those rare cases, you will need to close the locking application before copying.
TeraCopy vs FastCopy – which is better?
Both are excellent tools, but they serve different user profiles. TeraCopy is designed for users who want a polished GUI that integrates into Windows Explorer and replaces the default copy dialog. FastCopy is built for raw speed and is open-source, but it runs as a standalone application without shell integration.
In benchmark tests, FastCopy is slightly faster in most scenarios. On a 2.16 GB batch of music files (Kitz Forum tests), FastCopy completed in 98 seconds versus TeraCopy at 102 seconds. On single large files, they perform nearly identically. The speed gap is small enough that it rarely matters in practice.
Where they differ meaningfully:
- Shell integration: TeraCopy replaces Ctrl+C/V and right-click copy. FastCopy does not, so you always need to open its window separately.
- Checksum algorithms: TeraCopy offers 17+ hash options. FastCopy supports SHA-1, SHA-256, MD5, and xxHash.
- Price: FastCopy is fully free and open-source. TeraCopy free covers personal use; Pro costs $29.95.
- Queue management: TeraCopy auto-queues multiple transfers. FastCopy requires manual configuration.
- UI design: TeraCopy has a modern, clean interface. FastCopy’s UI is functional but dated.
Pro tip: If you prioritize shell integration and a user-friendly experience, TeraCopy is the better fit. If you care about open-source licensing and want every last percentage of raw speed, go with FastCopy.
Does TeraCopy have a portable version?
Yes. Code Sector distributes a portable ZIP archive at codesector.com/files/teracopy.zip. Download it, extract the contents to any folder (a USB drive, a cloud-synced directory, or a local folder), and run the TeraCopy executable directly. No system-wide installation, no registry entries, no admin privileges required for basic use.
Inside the extracted folder, there is an install.cmd script. Running it adds TeraCopy to the Windows Explorer right-click context menu on that specific machine, which does require admin rights. If you skip this step, you can still use TeraCopy by launching it manually and dragging files into its window.
The portable version is popular with IT technicians and help desk staff who work on different machines throughout the day. You keep TeraCopy on a USB stick and use it wherever you need it without leaving a footprint on the client’s system.
Pro tip: The portable version stores its settings in the same folder as the executable. If you want to carry your preferences between machines, just keep the entire folder together on your USB drive.
Download the portable version from our download section.
Can TeraCopy pause and resume file transfers?
Yes, and this is one of the features that sets TeraCopy apart from Explorer. Click the Pause button (or press the Space bar) during any transfer and TeraCopy fully stops reading and writing. Unlike Explorer’s pause, which sometimes keeps file handles open and blocks other applications from accessing the drive, TeraCopy releases its file handles so other programs can use the disk without conflict.
Click Resume (or Space again) and the transfer picks up exactly where it stopped, without re-reading files that were already completed. This is useful when you need to temporarily free up disk bandwidth for a game, a video render, or a database query, then continue the transfer afterward.
For interrupted transfers (power loss, system crash, USB disconnection), TeraCopy handles the restart intelligently. Start the same copy operation again and TeraCopy detects the files that already exist at the destination. It offers to skip them, overwrite them, or overwrite only if the source is newer, effectively resuming where the crash left off.
Pro tip: If you are running a multi-hour transfer overnight, use the “Post-action” dropdown to set TeraCopy to shut down or hibernate the PC after completion. That way, you do not waste electricity running an idle system.
Does TeraCopy work with network drives and NAS?
Yes. TeraCopy works with mapped network drives (like Z:), UNC paths (like \\server\share), and NAS devices over SMB. It handles network transfers more gracefully than Explorer because it can wait and retry when the connection temporarily drops, rather than failing the entire transfer immediately.
For transfers over unstable network connections (Wi-Fi, VPN tunnels, remote offices), TeraCopy’s error recovery becomes especially valuable. If a file fails to copy due to a network timeout, TeraCopy retries it several times before skipping. The rest of the transfer continues uninterrupted, and you get a report of any files that could not be copied.
TeraCopy 3.17 added a “network recovery wait” feature that pauses the transfer and waits for the network connection to come back instead of immediately marking files as failed. This is useful for laptop users who move between Wi-Fi access points mid-transfer.
Pro tip: When copying large volumes of data to a NAS, enable queue mode so TeraCopy runs one job at a time. Running parallel transfers to the same network share can saturate the NAS CPU and actually slow things down.
How do I update TeraCopy to the latest version?
TeraCopy does not have a built-in auto-updater in the standalone installer version. To update, download the latest installer from our download section and run it. The installer detects the existing installation and upgrades it in place, preserving your settings and Pro license (if applicable). You do not need to uninstall the old version first.
If you installed TeraCopy from the Microsoft Store, updates are handled automatically through the Store’s update mechanism. Open the Microsoft Store app, go to Downloads and Updates, and click “Get updates” to check manually.
To check which version you are currently running, open TeraCopy and look at the title bar or go to Help > About. The current stable version is 3.17, released December 2023. The latest beta is 4.0 RC2, released September 2025.
Pro tip: Follow the Code Sector blog at blog.codesector.com or their Telegram channel to get notified when new versions drop. Major releases like v4.0 sometimes include changes to the shell integration that benefit from a clean install rather than an in-place upgrade.
Does TeraCopy preserve file timestamps and attributes?
Yes. TeraCopy preserves original creation dates, modification dates, and access timestamps during both copy and move operations. This means your files keep their original “Date modified” and “Date created” values at the destination, which is critical for maintaining folder sorting, version tracking, and archival integrity.
File attributes (read-only, hidden, system, archive) are also preserved. If a source file is marked as read-only, the copied file at the destination will have the same attribute. This behavior matches what professional backup tools do and is one of the reasons sysadmins prefer TeraCopy over scripts that may strip attributes during transfer.
Windows Explorer also preserves timestamps during copy, but it changes the “Date created” timestamp to the current time. TeraCopy keeps the original creation date intact, which matters when you need files sorted by their actual creation date rather than the date they were copied.
Pro tip: If you are migrating data between drives and need to verify that timestamps were preserved, sort the destination folder by “Date modified” and compare it against the source. They should match exactly.
How do I uninstall TeraCopy completely?
Open Windows Settings (Win+I), go to Apps > Installed apps (Windows 11) or Apps & features (Windows 10), find “TeraCopy” in the list, and click Uninstall. The uninstaller removes the application files, shell extensions, context menu entries, and registry keys. Explorer may briefly flicker as the shell integration is deregistered.
After uninstalling, the default Windows copy dialog returns automatically. If you had set TeraCopy as the default copy handler, Ctrl+C/Ctrl+V and drag-and-drop operations revert to the standard Windows behavior.
TeraCopy stores user settings and transfer logs in C:\Users\[YourName]\AppData\Roaming\TeraCopy. The uninstaller does not remove this folder, so your preferences are preserved if you reinstall later. To remove everything, delete that folder manually after uninstalling.
Pro tip: If you installed the portable version, simply delete the extracted folder. If you ran install.cmd to add context menu entries, run it again with the uninstall flag, or manually remove the registry entries via regedit under HKEY_CLASSES_ROOT\*\shell\TeraCopy.
Does TeraCopy support macOS or Linux?
TeraCopy has a macOS version available on the Mac App Store. It is a separate product (v1.0) that provides basic file copy functionality with speed improvements and pause/resume on macOS 10.12 Sierra and later. However, the macOS version is not as feature-rich as the Windows version and does not include checksum verification or shell integration.
There is no Linux version of TeraCopy. On Linux, the closest alternatives are command-line tools like rsync (with the --progress flag for transfer monitoring and --checksum for verification) and GUI file managers like Nautilus or Dolphin, which have improved their copy handling in recent years.
For cross-platform file transfer needs, rsync remains the gold standard on Linux and macOS, while TeraCopy is the go-to choice on Windows. If you work across both platforms, consider using rsync on Linux/Mac and TeraCopy on Windows.
Pro tip: If you need TeraCopy-like features on macOS with more depth, look into rsync with a GUI frontend like Grsync, which offers checksum verification and detailed logging similar to TeraCopy Pro.
Why does TeraCopy show errors during file copy?
TeraCopy errors during transfer usually fall into a few categories, each with a specific fix:
- “File is in use” or “Access denied” — another application has the file locked. Close the application using the file, or enable VSS mode (run TeraCopy as administrator) to copy a shadow snapshot of the locked file.
- “Path too long” — the file path exceeds Windows’ 260-character limit. TeraCopy 4.0 RC2 has improved long-path support. On 3.17, rename the deeply nested folders to shorten the path, or enable long paths in Windows Group Policy.
- “CRC error” or “Data error” — the source drive has bad sectors or the file is physically corrupted. Run
chkdsk /ron the source drive to attempt recovery, then retry the copy. - “Disk full” — the destination does not have enough free space. Free up space or choose a different target.
- “Network path not found” — the network share disconnected mid-transfer. Check your network connection and retry. TeraCopy 3.17’s network recovery wait feature can handle temporary dropouts automatically.
In all cases, TeraCopy skips the problematic files and continues with the rest of the job. After the transfer completes, the file list shows exactly which files failed, with error descriptions. You can select the failed files and click retry to attempt them again.
Pro tip: If you see repeated CRC errors from the same drive, back up whatever you can immediately. CRC errors on a mechanical drive often indicate the drive is beginning to fail.
TeraCopy vs Robocopy – which should I use?
Robocopy is a command-line tool built into Windows, designed for scripted, automated, and repeatable file operations. TeraCopy is a GUI application designed for interactive, on-demand file transfers. They are built for different workflows and many sysadmins use both.
Use Robocopy when you need to: mirror entire directory trees (/MIR), schedule recurring backup jobs via Task Scheduler, copy files with fine-grained retry and wait flags (/R:5 /W:10), use multi-threaded transfers (/MT:16), or integrate file operations into batch scripts and CI/CD pipelines.
Use TeraCopy when you need to: copy files interactively with a visual progress indicator, verify data integrity with checksums after transfer, pause and resume mid-transfer, use drag-and-drop or right-click context menu for file operations, or get a clear visual report of which files failed and why.
Robocopy does not support checksum verification. If you need to confirm that copied data is bit-perfect, TeraCopy is the better choice. Robocopy does not have a pause/resume feature; an interrupted Robocopy job needs to be restarted (though its /R flag handles retries automatically).
Pro tip: For the best of both worlds, use TeraCopy for interactive daily file management and Robocopy for scheduled nightly backup scripts. They do not conflict with each other.
How much memory does TeraCopy use?
TeraCopy is lightweight. During an active transfer, it typically uses between 30 and 80 MB of RAM depending on the buffer size configuration and the number of files in the queue. When idle (no active transfer), it sits at around 15-20 MB. Even on systems with only 2 GB of total RAM, TeraCopy runs without issues.
The buffer size setting in Preferences controls how much RAM TeraCopy allocates for read/write operations. The default is usually sufficient, but you can increase it up to 256 MB if you are transferring very large files to a fast NVMe drive and want to maximize throughput. On systems with limited RAM, keep the default or reduce it to 32-64 MB.
CPU usage during transfers is minimal, typically 1-3% on a modern processor. The bottleneck is almost always the disk speed, not the CPU or RAM.
Pro tip: If TeraCopy is using more than 100 MB of RAM during a transfer, check how many files are in the queue. Very large file lists (100,000+ items) increase memory usage because TeraCopy keeps metadata for each file in memory. For massive operations, consider splitting them into smaller batches.